

Today, Hadley and I are learning how to draw a rose, and it is a truly wonderful activity to share. This drawing, you know, is perfect for special occasions like Valentine's Day or even Mother's Day, offering a handmade touch that really means a lot. For many, learning how to draw a rose can feel a bit intimidating, especially for those just starting out with art. We hear you on that, it's a common feeling.
You might be wondering if you can really draw roses that impress, and the good news is, you absolutely can. We have put together these drawing guides, which progress from very easy designs to more complex realism, making them perfect for artists at nearly any level. So, whether you are just picking up a pencil or have some experience, there is something here for you.
This "how to draw a rose step by step" tutorial aims to make creating this beautiful flower super easy, making it very suitable for beginners as well as kids. With just a few simple shapes and some guidance, you can bring a lovely rose to life on your paper. Roses are often called the symbol of romance and love, and they are, in a way, beautiful and breathtaking to look at. If you do not have a green thumb, you can still create a rose on paper, which is pretty neat.
Table of Contents
- Why Learn How to Draw a Rose?
- Getting Started: What You'll Need
- How to Draw a Rose: 8 Easy Steps
- Tips for Drawing Impressive Roses
- Common Questions About Drawing Roses
Why Learn How to Draw a Rose?
Drawing a rose might seem tricky, but with the right steps, it is a fun and rewarding process. Whether you are a beginner using traditional tools like pencil and paper, or you prefer digital methods, the feeling of creating something beautiful is pretty special. Learning to draw a rose can be a very rewarding and relaxing experience, offering a quiet moment to yourself.
A Symbol of Love and Beauty
Roses, as we know, are deeply connected with feelings of love and affection. Drawing one means you can capture that feeling and keep it, kind of like a memory. You can create a rose flower in full bloom that lasts forever, which is quite different from a real flower that fades. This makes your drawing a truly lasting gift, perhaps for someone you care about or just for yourself, to remind you of beauty.
A Rewarding Creative Outlet
Drawing a rose is both a challenge and a pleasure. It lets you express your creative side, and that is a very good thing. You get to see your skill grow with each attempt, which is rather satisfying. It is a way to relax, to focus your mind, and to make something lovely with your own hands. This process can be quite calming, honestly.
Getting Started: What You'll Need
Before you begin to draw a rose, gathering a few basic supplies can make the process much smoother. You do not need anything fancy, just some simple things to get you going. Having these ready means you can focus on the drawing itself, which is what we want, right?
You will need some paper, of course, any kind will do to start, but a slightly thicker paper might feel a bit better. A pencil is pretty essential, maybe one with a medium hardness, like an HB or 2B, which allows for both light sketches and darker lines. An eraser is also very helpful for fixing mistakes or lightening lines, so make sure you have a good one handy. Sometimes, a blending stump or even your finger can help with shading, if you want to add that extra touch.
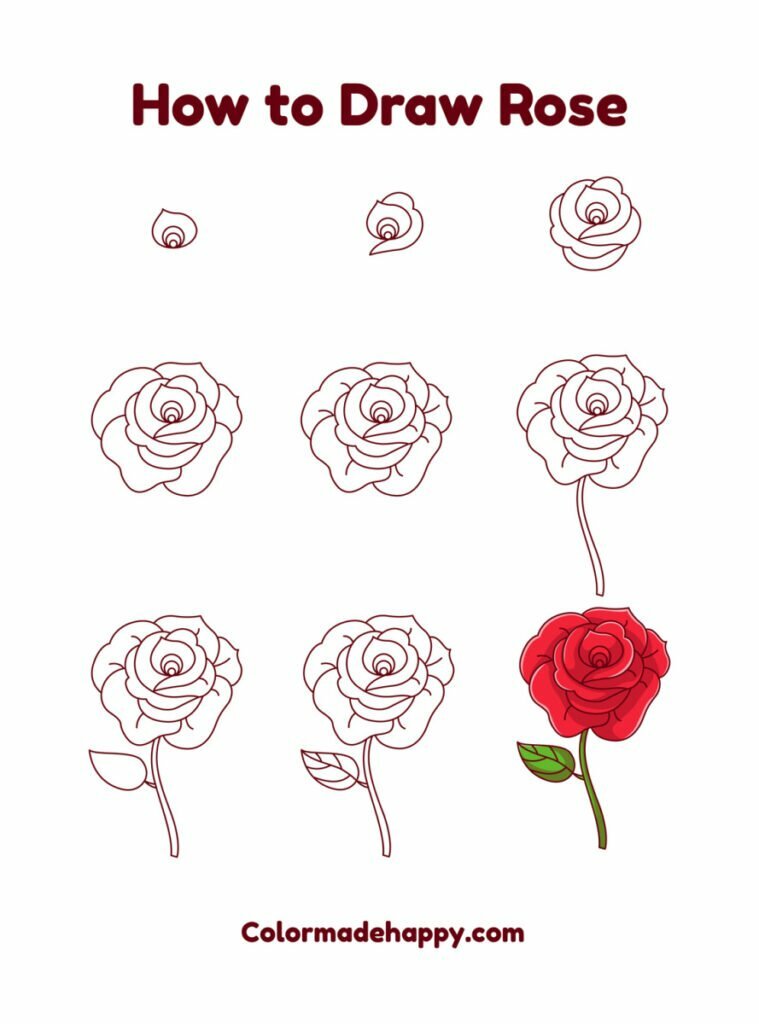
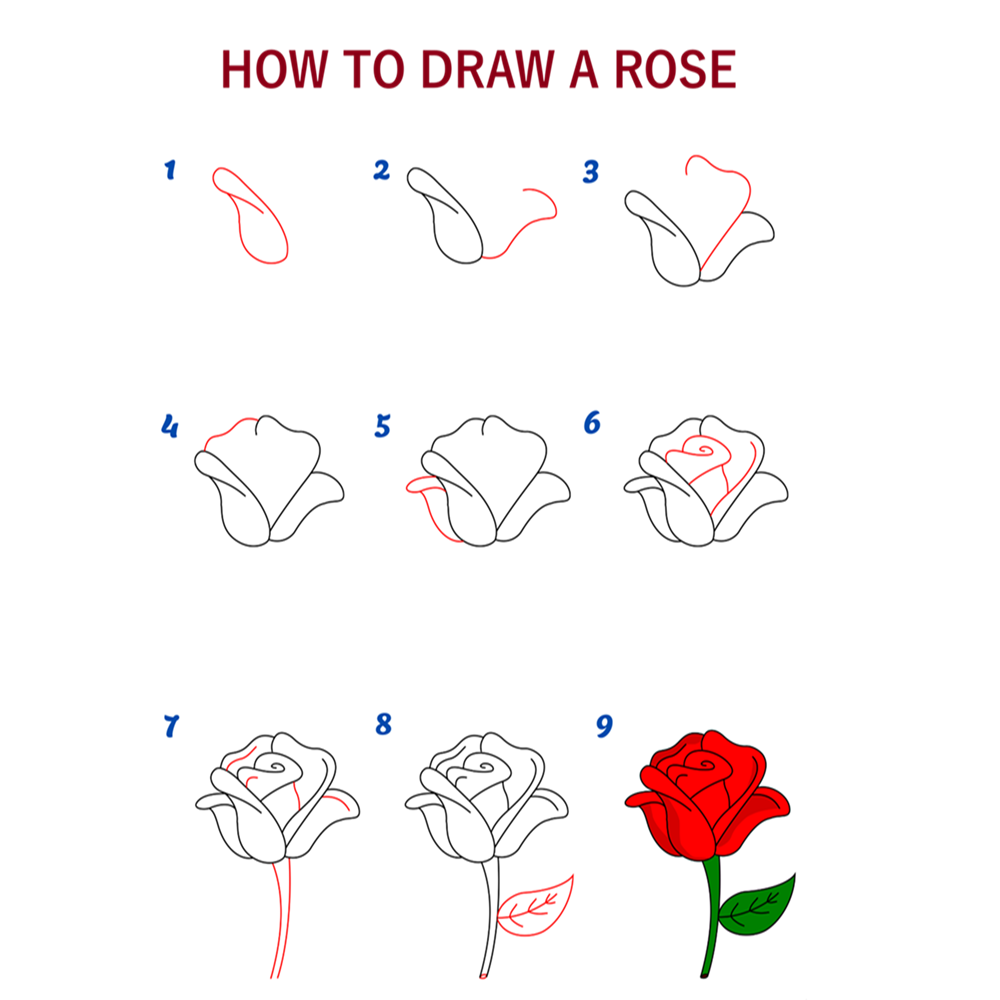
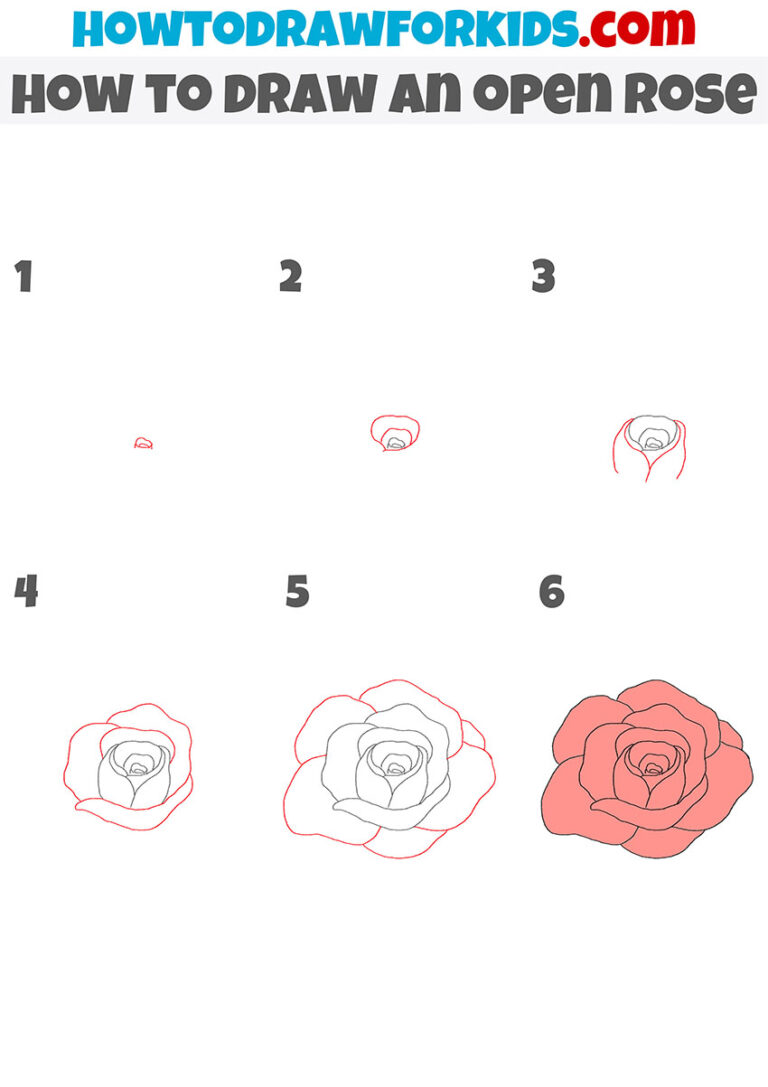
How to Draw a Rose: 8 Easy Steps
We are going to learn how to draw a rose in 8 steps using these easy step-by-step instructions. The final drawing will be a rose in full bloom, which is pretty exciting. Follow along to learn how to draw this realistic rose easy, step by step. It is simpler than you might think, actually.
Step 1: The Basic Shape
Start by gently sketching a very light circle on your paper, this will be the basic guide for your rose's overall size and shape, kind of like setting up a stage for your flower. Do not press too hard, as these lines are just temporary, you know. Think of it as a loose outline, a bit like drawing a cloud, just a very soft one.
Step 2: The Center Swirl
Inside that circle, draw a small, somewhat irregular spiral or a "C" shape in the middle, this will be the very core of your rose, where the petals begin to curl. This central part is what gives the rose its characteristic tight center, so take your time with it, it is pretty important. It is almost like drawing a tiny, gentle tornado, if you can imagine that.
Step 3: Adding Inner Petals
Now, from that central swirl, start adding small, curved lines that look like little cups or bowls, these will form the inner petals. These petals should overlap slightly, wrapping around the center in a gentle way. Think of them as soft, delicate layers, each one peeking out from behind the one before it, which is kind of how real roses grow.
Step 4: Developing Outer Petals
Next, draw larger, more open petal shapes around the inner ones, extending outwards towards your initial circle guide. These outer petals will be wider and less tightly curled, showing more of their surface. Make sure they also overlap, giving your rose a sense of fullness, you know, a bit like a dress with many ruffles. They should look a bit looser than the inner ones, actually.
Step 5: Shaping the Bloom
At this point, you can begin to refine the overall shape of your rose, making the petals look more natural and less like simple curves. Add small dips and folds to the edges of the petals, which gives them a more realistic, organic look. This is where your rose really starts to take on its full form, kind of like a sculpture coming to life. You can also erase any of your initial light guide lines now, which is pretty satisfying.
Step 6: Drawing the Stem and Leaves
From the bottom of your rose bloom, draw a simple, slightly curved line for the stem. Then, add a few small, pointed shapes along the stem for the leaves. Rose leaves typically have jagged edges and a central vein, so you might want to add those details, which really helps make it look like a rose. Remember, a little curve in the stem can make it look more natural, rather than just a straight line, you know.
Step 7: Adding Details and Shading
Now is a good time to add some final details to your petals, like very fine lines to suggest veins or slight creases. Then, think about shading. Use your pencil to add darker areas where petals overlap or where light would naturally be blocked, like in the deeper parts of the bloom. This gives your rose a sense of depth and dimension, making it look much more real, which is pretty cool.
Step 8: Refining Your Rose
Take a step back and look at your drawing. Are there any lines that need to be darker or lighter? Do the petals look full enough? This is your chance to make any final adjustments, to really bring your rose to its best form. You can add more shading, smooth out lines, or even add a few tiny thorns to the stem, if you like that detail. The goal is to make it look like a beautiful, finished rose in full bloom, which is what we were aiming for, right?
Tips for Drawing Impressive Roses
Drawing a rose is both a challenge and a pleasure. It is a creative process, and there are always ways to make your drawings even better. Here are a few thoughts to help you along your way, you know, to really make those roses pop.
Practice Makes a Difference
Like anything new, the more you practice how to draw a rose, the better you will become. Do not worry about making a perfect drawing every time; the point is to enjoy the process and to learn from each attempt. Every line you draw, every petal you shape, adds to your skill, so just keep at it, it is pretty rewarding.
Experiment with Styles
There are so many ways to draw a rose. You can try a simple, cartoon-like style, or you can push for something very realistic. Try different angles, too, or maybe just focus on one part of the flower. Experimenting helps you find what you enjoy most and what looks best to you, which is really what art is about, in a way. You might discover a style that is uniquely yours, which is pretty exciting.
Use Reference Photos
Looking at real roses or good quality photographs of roses can be incredibly helpful. Pay attention to how the petals overlap, how light hits them, and how the stem and leaves connect. This kind of observation helps you understand the flower's structure better, making your drawings more believable. You can find many images online, perhaps on a site like The Metropolitan Museum of Art's collection of rose drawings for inspiration, which is a great resource.
Common Questions About Drawing Roses
Many people have similar questions when they start to draw a rose. We have gathered a few of the most common ones to help you out, you know, to clear up any confusion you might have.
Is it hard to draw a rose?
Learning how to draw a rose can seem a bit difficult for beginners, honestly. But with a step-by-step approach, it becomes much more manageable. The trick is to break it down into smaller, simpler parts, rather than trying to draw the whole thing at once. As you saw in our 8 steps, it is really about building up the flower layer by layer, which makes it much less intimidating.
What is the easiest way to draw a rose?
The easiest way to draw a rose involves starting with simple shapes like circles and spirals, then gradually adding petals. Our 8-step guide is designed to be super easy, making it perfect for beginners as well as kids, as it focuses on those basic shapes first. It is all about building confidence with each small addition, which helps a lot.
How do you draw a rose for beginners?
For beginners, drawing a rose starts with light guiding shapes and then adding petals in layers, moving from the center outwards. This how to draw a rose step by step tutorial makes drawing this beautiful flower super easy, making it perfect for anyone just starting out. It is about taking it one small piece at a time, and before you know it, you will have a lovely rose. You can learn more about drawing basics on our site, and also find other helpful tips on our art tutorials page.
So, whether you are a budding artist or an absolute beginner, drawing a rose is a very rewarding experience. It is a way to create something beautiful, to express yourself, and to enjoy a peaceful, creative moment. Keep practicing, and you will be drawing impressive roses in no time, honestly.
Detail Author:
- Name : Dr. Mollie O'Connell
- Username : wisozk.chance
- Email : ekuphal@hotmail.com
- Birthdate : 1976-09-29
- Address : 5376 Johann Ranch Apt. 254 Lake Lisettetown, MI 98618
- Phone : +15672218112
- Company : Toy-Walker
- Job : Child Care
- Bio : Eligendi possimus consequuntur architecto fuga saepe voluptas. Maxime quod odit consequuntur perferendis culpa. Nihil doloribus odio recusandae dolores minus.
Socials
twitter:
- url : https://twitter.com/brant.robel
- username : brant.robel
- bio : Ut quibusdam sunt et quia facilis. Facere fugit dignissimos est. Assumenda officia sint omnis et natus.
- followers : 1557
- following : 2407
linkedin:
- url : https://linkedin.com/in/robel2004
- username : robel2004
- bio : Nemo ullam esse sint rerum sed.
- followers : 1401
- following : 1953


 Bonus
Bonus